
Silhouette & Proportion Diagnostic
(The “Fit Matrix”)
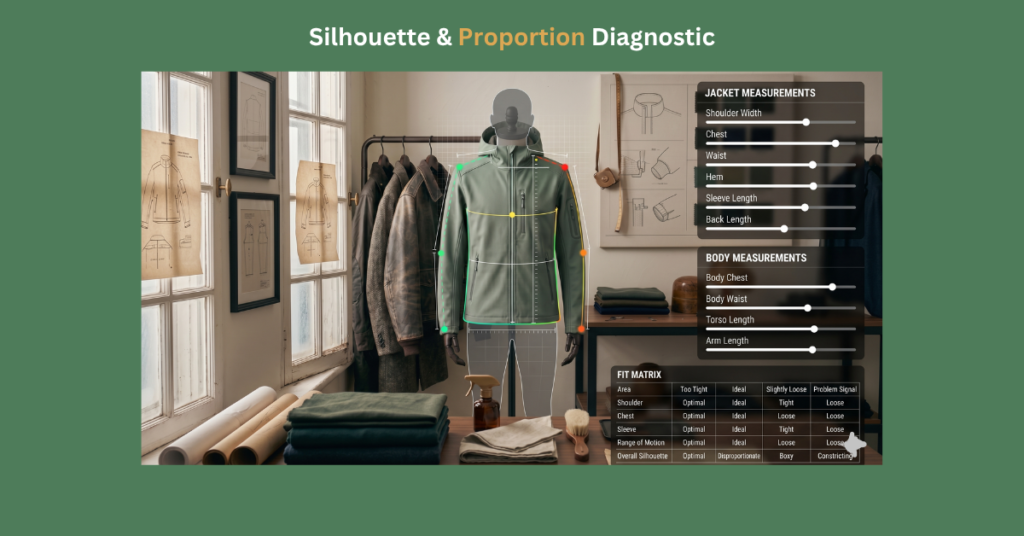
Silhouette & Proportion Diagnostic
(The “Fit Matrix”)
Optimizing outerwear proportions requires moving beyond basic static shoulder alignment and utilizing a systematic diagnostic protocol—the Fit Matrix—to isolate and eliminate the structural tension caused by mismatched layering volumes, incorrect sleeve pitch, and fastener engagement.
An outerwear piece can have perfect static shoulder alignment on a dress form, yet still exhibit severe structural distortion and jacket drape distortion when integrated into the dynamic, kinetic reality of daily wear.
This framework provides a six-phase diagnostic protocol to isolate the variables compromising your outerwear mobility, analyze the drape data, and establish strict pairing standards to guarantee a flawless silhouette.
Quick Diagnostics: Understanding Outerwear Fit Issues
To provide immediate clarity, this section directly diagnoses the most common causes of outerwear drape distortion and visual imbalance.
Why does my jacket fit in the shoulders but look boxy?
A jacket that aligns perfectly at the shoulder but looks boxy suffers from structural tension, usually caused by layering high-volume knitwear underneath an outerwear piece cut with a high armscye, which restricts drape and forces the fabric outward.
How do mid-layers affect outerwear proportions?
Mid-layer volume directly dictates outerwear proportions by altering the internal circumference of the garment. Thick sweaters require outerwear with a lower armscye and a wider chest block to prevent armscye binding and restricted articulation.
Why does fastening my coat ruin the silhouette?
Fastening a coat engages its waist suppression. If the coat’s natural center of gravity and waist suppression do not align perfectly with your hip structure and layering volume, closing the fasteners will induce lateral tension and visual distortion.
Phase 1 & 2: Establishing the Research Protocol and Isolating Variables
Establishing a valid diagnostic protocol requires formulating a precise definition of the physical restriction and systematically separating the independent layering variables from the confounding base variables.
Phase 1: Defining the Structural Restriction
Formulate a precise, documented definition of the physical or visual restriction before initiating the testing sequence. Jacket drape distortion often manifests as a biomechanical failure. An outerwear piece can possess perfect shoulder alignment but still exhibit structural distortion. A precisely cut jacket feels physically restricted or visually boxy across the chest when paired with standard winter clothing.
This specific restriction originates at the glenohumeral joint. Tension radiates across the trapezius muscle and serratus anterior, compromising the drape coefficient and stripping the garment of its required functional ease. The armscye—the armhole opening in a garment—acts as the primary fulcrum for upper-body kinematics. When styling factors and garment constraints ignore this fulcrum, coat fit issues multiply rapidly. Layering variables induce structural tension.
Phase 2: Isolating the Variables
Identify and physically separate your baseline control garments from your active test layers to ensure accurate proportion metrics. To objectively monitor garment tension, you must isolate the independent variables dictating the fit.
- Compare a low-profile cotton tee against high-volume heavy knitwear beneath the jacket to identify armscye tension.
- Test fastener engagement (open vs. closed) to identify how waist suppression interacts with the hips.
You must control confounding variables. The wearer must maintain identical trousers and footwear across all tests. A consistent lower-body baseline stabilizes the visual assessment. Altering the lower-body silhouette or heel height skews perceived proportions and directly impacts the center of gravity and drape of the upper-body garment. Consult our guide on [Trouser Proportions] to set an accurate baseline.
Phase 3 & 4: Data Collection Log and Quantitative Analysis
Accurate fit evaluations require logging precise physical tension points during structured wear cycles and synthesizing that data into an objective styling insight.
Phase 3: The Fit Matrix Data Log
Log the precise physical tension points and assign visual integrity scores after each documented wear cycle. Execute four variations during your next wear cycles and document the results immediately. Track these drape ratings to record jacket wearability accurately.
| Iteration | Base/Mid-Layer Volume | Fastener Status | Identified Structural Tension Points | Mobility Score (1-10) | Silhouette Integrity Score (1-10) |
|---|---|---|---|---|---|
| Ex: 01 | High Volume (Heavy Wool) | Open | Armscye binding: tension across the yoke. | 4 (Restricted articulation) | 5 (Excessive bulk) |
| Iteration 1 | Low Profile (Cotton Tee) | Open | Log data here… | ||
| Iteration 2 | Low Profile (Cotton Tee) | Closed | Log data here… | ||
| Iteration 3 | High Volume (Sweater) | Open | Log data here… | ||
| Iteration 4 | High Volume (Sweater) | Closed | Log data here… |
Phase 4: Quantitative Analysis of Silhouette Scores
Calculate the optimal styling parameters by isolating the highest-scoring garment combinations in your matrix.
First, isolate only data entries where the Silhouette Integrity Score achieved an 8 or above. Second, identify correlating factors. Did optimal scores exclusively correlate with low-profile layers? Third, synthesize data into an objective conclusion. Without conducting formal Electromyography (EMG) tests on muscle strain, you can observe kinematic resistance visually. Evaluate your layering combinations to finalize your insights.
- Rule
Synthesize data into one core insight. - Reason
Prevents ambiguous styling guidelines. - Example
“High armscyes + heavy knits = restricted mobility.”
Create a mental Garment Compatibility Decision Matrix mapping base layers against specific outerwear pieces. Reference our [Knitwear Volume Guide] to categorize your mid-layers accurately.
Phase 5 & 6: Strategic Implementation and Real-World Validation
The final step in eliminating visual disproportion is translating your matrix insights into a definitive, testable sartorial guideline that dictates exactly how the garment is worn.
Phase 5: Establishing the Styling Protocol
Finalize and implement the documented rule-set into your daily wardrobe system. Apply the Testable Hypothesis Framework to lock in jacket styling rules and correct topcoat visual imbalance. Complete this checklist for the problematic garment to establish strict outerwear pairing standards.
- Identify garment seasonality (e.g., temperate-weather asset)
- Define strict pairing rules (e.g., exclusively low-profile layers)
- Define fastener rules (e.g., must remain unfastened)
- State the eliminated problem (e.g., armscye tension removed)
Use this prompt to lock in your fit protocol:
“My hypothesis is that by categorizing this jacket strictly as a asset, utilized exclusively with and , I can eliminate and consistently achieve a Silhouette Integrity Score of or higher.”
Generated Diagnostic Prompt:
Phase 6: Protocol Validation & Summary
Test your styling hypothesis in real-world scenarios to guarantee the structural issue is permanently eliminated. This practice enforces your coat layering guidelines.
Use a Real-World Mobility Validation Checklist to confirm articulation across physical activities (e.g., driving, reaching overhead, sitting) without regressing into visual distortion. Ensure you review [Understanding Armscye Height] to master this evaluation.
Phase 7: Conclusion
By strictly defining the problem, controlling variables, tracking iterations, and establishing data-backed styling protocols, you eliminate the guesswork from your wardrobe. Review the core methodology to ensure long-term mastery of garment proportions.
The Fit Matrix transforms frustrating outerwear fit issues into solvable, scientific equations. This rigorous approach ensures every jacket drapes perfectly according to its intended structural design.
Phase 8: Troubleshooting & Edge Cases (FAQ)
Even with a rigorous diagnostic protocol in place, specific edge cases and tailoring limitations often require targeted troubleshooting to maintain perfect silhouette integrity.
Why does my jacket fit in the shoulders but look boxy?
A jacket that aligns perfectly at the shoulder but looks boxy suffers from structural tension, usually caused by layering high-volume knitwear underneath an outerwear piece cut with a high armscye, which restricts drape and forces the fabric outward.
How do mid-layers affect outerwear proportions?
Mid-layer volume directly dictates outerwear proportions by altering the internal circumference of the garment. Thick sweaters require outerwear with a lower armscye and a wider chest block to prevent armscye binding and restricted articulation.
Why does fastening my coat ruin the silhouette?
Fastening a coat engages its waist suppression. If the coat’s natural center of gravity and waist suppression do not align perfectly with your hip structure and layering volume, closing the fasteners will induce lateral tension and visual distortion.
Why does my jacket look boxy even if the shoulders fit perfectly?
This is usually caused by mid-layer volume conflicting with a high armscye (armhole), or fastening a jacket that lacks sufficient waist suppression. Use the Fit Matrix to isolate whether the sweater or the buttons are causing the distortion.
Can a tailor fix armscye tension if I still want to wear heavy knitwear?
Usually, no. Lowering an armscye is structurally complex and often impossible without ruining the garment’s balance. Your best option is to restrict the jacket to low-profile base layers as identified in your styling protocol.
How many wear cycles are needed to validate a new fit protocol?
We recommend a minimum of three distinct wear cycles (e.g., a commute, a day at the desk, and an evening out) to ensure the Silhouette Integrity Score remains consistently high across varied mobility demands.
Ready to Master Your Wardrobe Proportions?
Download the printable Fit Matrix data log and begin isolating your garment variables today.
Disclaimer:
The Fit Matrix and all diagnostic protocols are provided for informational and styling purposes only. Individual garment construction, fabric drape, and personal anatomy vary. Always consult with a professional tailor before making permanent structural alterations to your outerwear.